You have subscribed to the Solo Executive plan or the Entreprise plan and you want Julie to be fully integrated in your company? To do so, Julie needs her own email address based on your domain name. How to create it? Here is what you should know.
N.B: Julie's email address has to contain the first name Julie. You can, of course, add the last name of your choice.
You are using Gmail
- Sign in to the Google Admin console
- Click Users
- Click Plus button and select Add user
- Write Julie in the First Name section, choose any Last Name you want and your Primary email address should appear like that: Julie@yourcompany.com If your account has multiple domains associated with it, select the domain you want to add the user to
- (optional) you can set a secondary email address to julie@juliedesk.com
- Click Auto-generate the password and create
- Click Email instructions and send it to you.
- Click Done
- Once you received that email, please send us a message at hello@juliedesk.com.
You are using Outlook 365
- Go to the Office 365 admin center
- Choose Users > Active Users. Click Plus button
- Then the "Create a new user account page"
- Write “Julie” in the First Name section, choose any Last Name you want and in the Display Name “Julie + the last name”
- In the "User Name" section add “Julie” and choose the domain name you’d like as it should appear like that : julie@yourdomain.com. If you have more than one domain, be sure to select the right one
- By default, Office 365 auto-generates a new temporary password for the person. You do not need to change it
- In the “Email password to the following recipients” field, type your email address
- Click “Create”
- Once you received that email, please send us a message at hello@juliedesk.com.
If you are using other services (not listed above)?
You should know better than us how to create a Julie@yourcompany.com. However here is what you should know to have everything working:
- Emails should be redirected from julie@yourcompany.com to julie@juliedesk.com. Most of the time, you’ll have to take care of this setting. If you don’t know how to do that we may be able to help if you tell us the name of your email provider
- For us to be able to send email using julie@yourcompany.com and avoid spam filter, we will need SMTP authentification for this account. Please provide us your SMTP server information and the credentials for the account julie@yourcompany.com by sending a message at hello@juliedesk.com.
Once her address is created, please send to our support team the email address and its password as well as the webmail you used to create the account (meaning the URL we have to go to to enter Julie's mailbox).
To share your calendar with Julie, you have to follow the next steps :
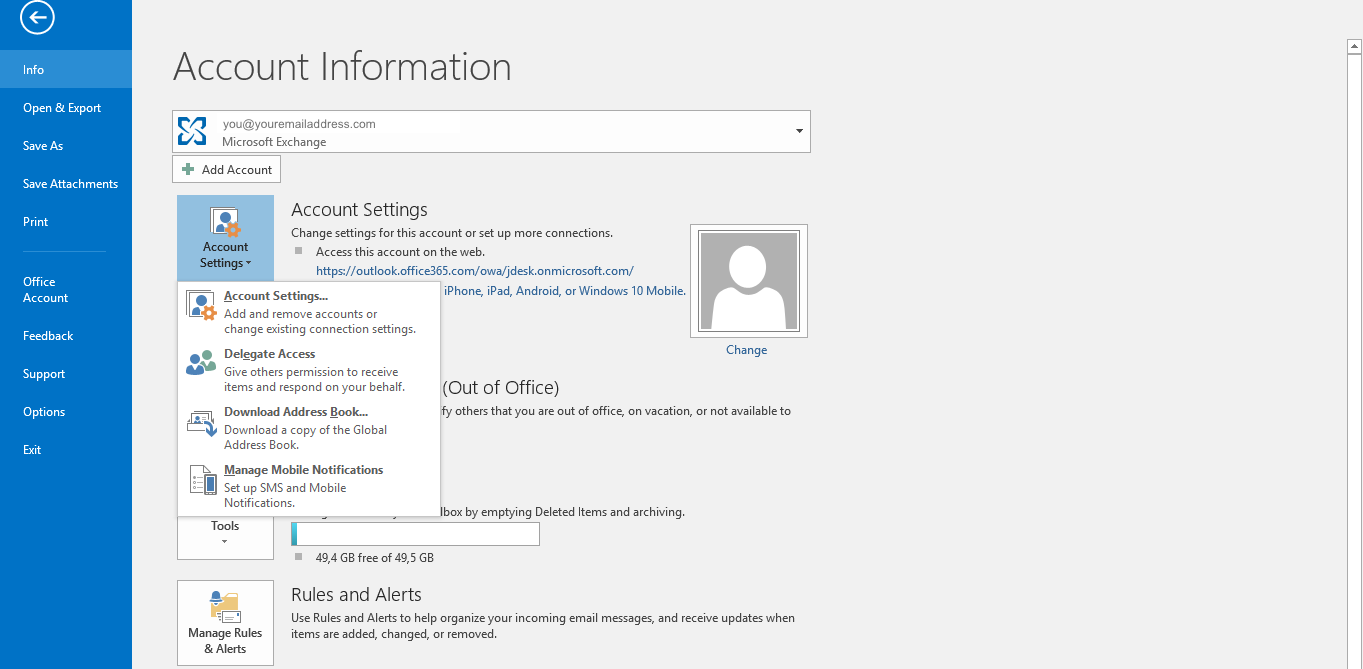
- Log into your Outlook Application. Click Files > Info, then Account Settings and then choose Delegate Access
- In the Delegates Pop up window, click on Add to add Julie's email address

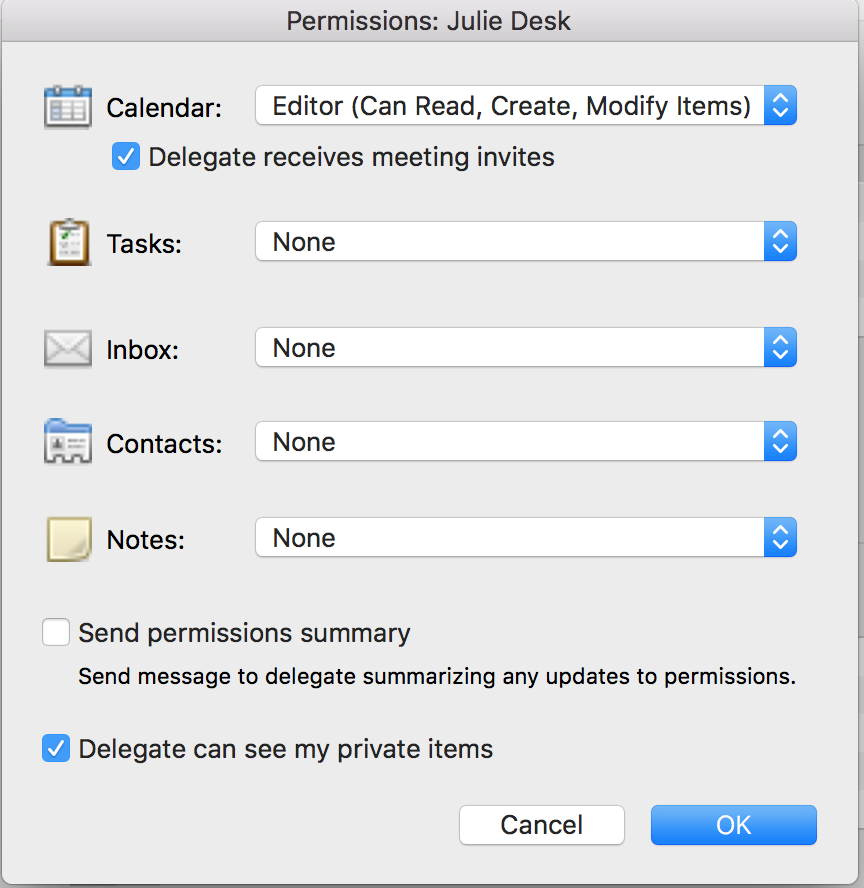
- Then, click on the Permissions button and :
- Choose Editor as the level of permissions
- Task, Inbox, Contacts and Notes should be on None
- Uncheck the "Delegate receives copied of meeting-related messages sent to me" box and "Automatically send a message to delegate summarizing these permissions"
- Check the "Delegate can see my private items" box
Julie will not share information about your private items with anyone else than you, and only when one of these events is in conflict with a meeting she is scheduling for you.

We have described the process as much as possible. The appearance could change depending on the version you’re using. If you have any questions regarding this, do not hesitate to contact the help team at Julie Desk. We would be delighted to help you.
To share your calendar with Julie, you have to follow the next steps :
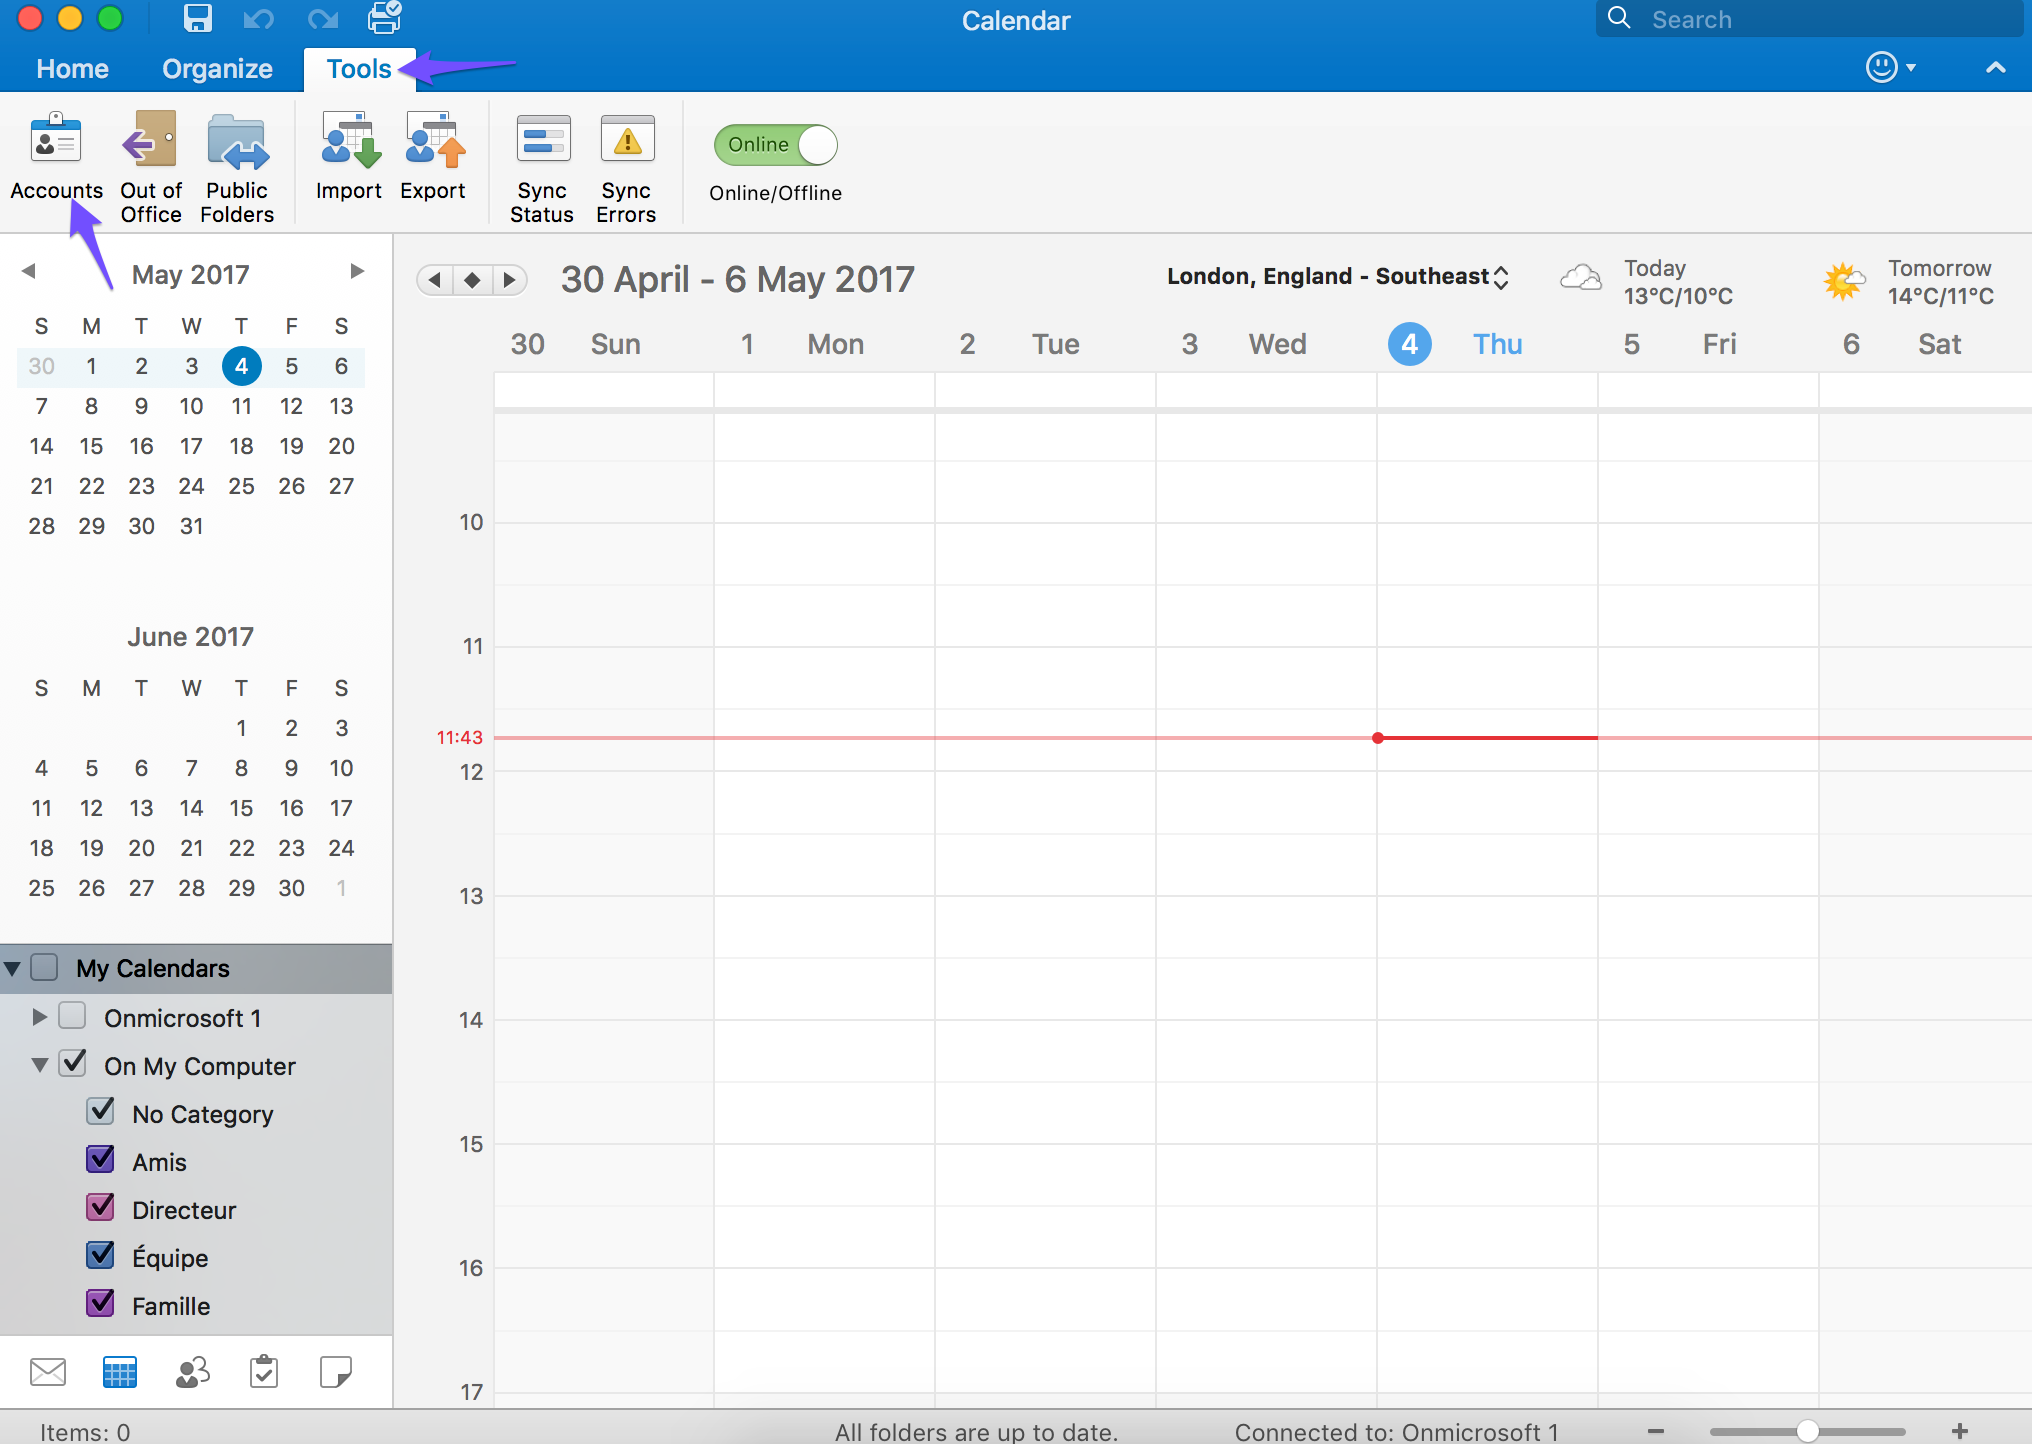
- Log into your Outlook Application. On the Tools menu, click Accounts

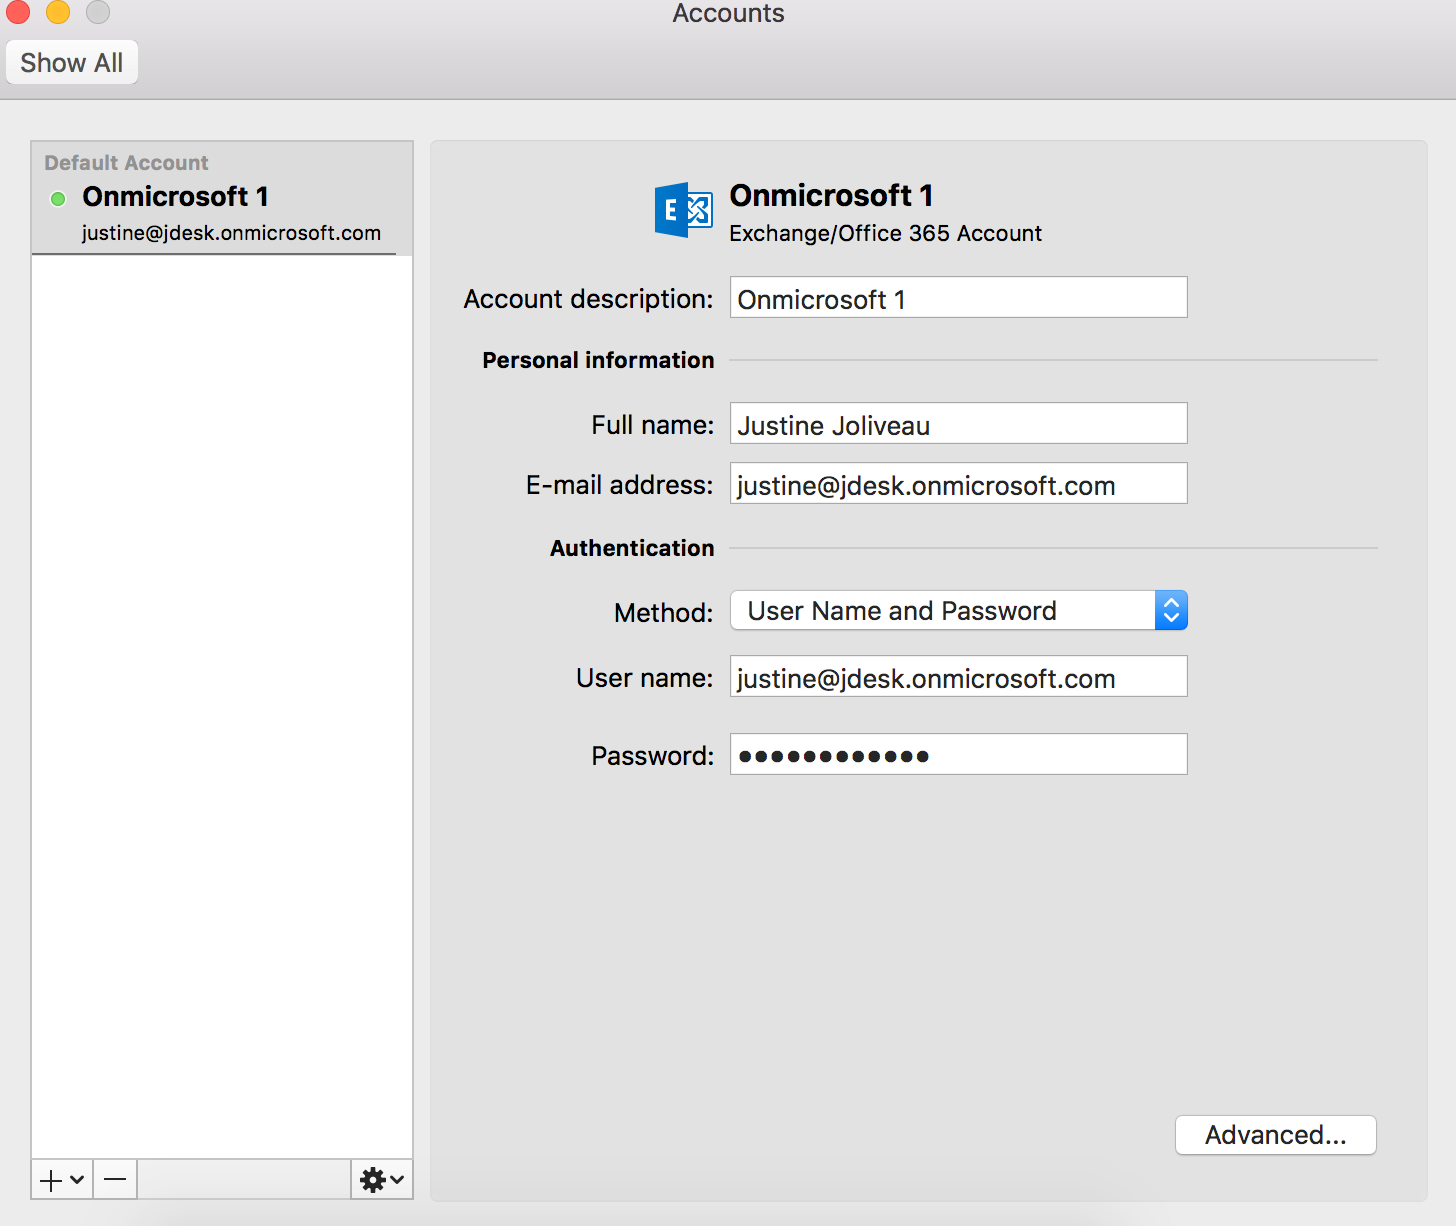
- Click the account that you want to add a delegate to, click Advanced, and then click Delegates.
- Under Delegates who can act on my behalf, click Add, and type the name of the person that you want to add as a delegate.

- In the Permissions box:
- Choose Editor as the lever of permissions
- Uncheck the "Delegate receives copied of meeting-related messages sent to me" and "Send permissions summary" boxes
- Check the "Delegate can see my private items" box
Julie will not share information about your private items with anyone else than you, and only when one of these events is in conflict with a meeting she is scheduling for you.
We have described the process as much as possible. The appearance could change depending on the version you’re using. If you have any questions regarding this, do not hesitate to contact the help team at Julie Desk. We would be delighted to help you.
Have a julie@votresociété.com address under Office365 or Microsoft Exchange? It is possible that the password for this email address expires automatically after a certain time.
When this happens, we lose access to her mailbox and no longer receive the emails you send us!
To change your Julie's password expiration settings, check out the Microsoft support article available here.